
To put a bobber on your fishing line, thread the bobber onto the line before tying a small knot below it. Use a slip knot to secure the bobber in place.
Fishing with a bobber is a popular technique to attract and catch fish effectively. Whether you are a beginner or an experienced angler, using a bobber can increase your chances of success. Not only does it help suspend your bait at a desired depth, but it also serves as a visual indicator when a fish bites.
By following a simple process, you can easily attach a bobber to your fishing line and improve your fishing experience. We will provide you with step-by-step instructions on how to put a bobber on your fishing line successfully.
Bobbers Types
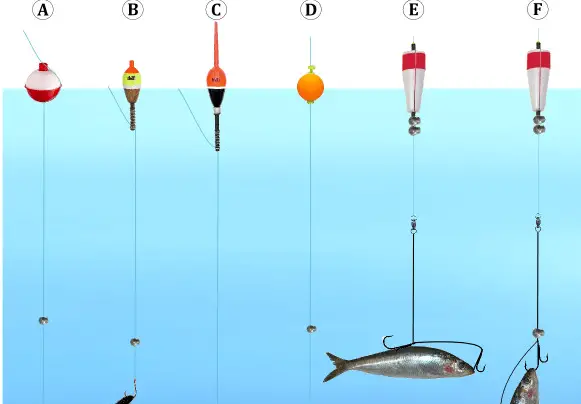
The choice of bobber is an important decision when it comes to fishing. A bobber is a useful tool that helps anglers to detect when a fish is biting. It prevents the bait from sinking too deep into the water and allows for precise depth control. There are different types of bobbers that you can use, and each has its own advantages. In this article, we will discuss the two main types of bobbers: Fixed Bobbers and Slip Bobbers.
Fixed Bobbers
Fixed bobbers are the more traditional type of bobber that many anglers are familiar with. They consist of a float that is attached to the fishing line at a fixed point. These bobbers can be made of various materials such as cork, plastic, or foam.
Using a fixed bobber is simple. You attach it to your fishing line by threading the line through the top and bottom holes of the bobber. Then, you can adjust the depth of the bait by either moving the bobber up or down on the line. Fixed bobbers are suitable for fishing in shallow water, where you want to keep the bait suspended at a specific depth.
One advantage of fixed bobbers is that they are easy to set up and use. They are also less likely to tangle or get caught in weeds compared to other types of bobbers. Furthermore, fixed bobbers are usually more visible, making it easier for anglers to spot when a fish bites.
Slip Bobbers
Slip bobbers are a popular choice for anglers who want more flexibility in adjusting the depth of their bait. Unlike fixed bobbers, slip bobbers can slide freely up and down the fishing line, allowing you to set the bait at different depths easily.
When using a slip bobber, you need to first thread a bobber stop onto the line, followed by a slip bobber. The bobber stop is a small plastic piece that prevents the slip bobber from sliding all the way down to the hook. By adjusting the position of the bobber stop, you can determine the maximum depth that the bait can be lowered.
Slip bobbers are particularly useful when fishing in deeper water, as you can easily adjust the depth to match the fish’s feeding zone. They also work well in situations where the water is moving, such as rivers and streams.
One advantage of slip bobbers is that they are less likely to spook fish, as the bait can move more naturally in the water. Additionally, slip bobbers are more sensitive to subtle bites, allowing anglers to detect even the smallest fish movements.

Choosing The Right Bobber
Choosing the right bobber involves understanding how to put it on the fishing line correctly. This simple step ensures optimal fishing results and keeps your bait at the desired depth in the water.
When it comes to fishing, using a bobber is essential for detecting bites and maintaining the desired depth of your bait. But with so many options available, it is important to choose the right bobber that suits your fishing style and the conditions you’ll be facing. In this section, we will dive into the factors to consider and the steps to follow when selecting the right bobber for your fishing line.
Consider Fishing Conditions
Before choosing a bobber, it is crucial to assess the fishing conditions you’ll be dealing with. Factors such as water depth, current strength, and the size of the fish you are targeting can greatly influence your bobber selection.
- Water Depth: In shallow water, a small and lightweight bobber is preferable. However, in deeper water, you might need a larger bobber that can support the weight of your bait and withstand strong currents.
- Current Strength: If you’ll be fishing in a location with a strong current, it is best to opt for a slip bobber. This type of bobber allows your bait to move naturally with the current, giving it a more realistic presentation.
- Fish Size: Different fish species have varying bite sensitivities. For smaller fish, a sensitive and highly visible bobber is ideal, whereas larger fish may require a more substantial bobber that can handle their powerful strikes.
Selecting The Right Size
The size of your bobber plays a crucial role in achieving the desired fishing experience. Here are some tips to help you select the right size bobber:
- Consider the Weight of Your Bait: If you are using a heavier bait, you will need a larger bobber to keep it afloat. On the other hand, lighter baits work well with smaller bobbers that won’t hinder their movement.
- Visibility: Opt for a bobber size that provides good visibility in the specific fishing conditions you’ll be facing. A bobber that can be easily seen from a distance ensures you won’t miss any bites.
- Buoyancy: Your bobber should have enough buoyancy to support both the weight of your bait and any potential fish that takes a bite. Ensuring the bobber stays buoyant will also help you detect bites more accurately.
By considering the fishing conditions and selecting the appropriate size, you can maximize your chances of success when attaching a bobber to your fishing line. So, the next time you head out to cast your line, make sure you’re equipped with the right bobber for a successful fishing adventure.
Preparing Your Fishing Line
Before you can enjoy a successful fishing trip with a bobber, you need to properly prepare your fishing line. This involves tying a bobber stopper knot to secure the bobber in place and attaching a swivel for added convenience. In this section, we’ll guide you through these necessary steps to get your line ready for action.
Tying A Bobber Stopper Knot
A bobber stopper knot is essential for securing your bobber at the desired depth. Here’s how you can tie a bobber stopper knot in a few simple steps:
- Begin by threading the end of your fishing line through the bobber’s top hole.
- Make a loop with the line and pull it back through the hole, creating a loose overhand knot.
- Wrap the loose end of the line around the main line two to three times, keeping the wraps tight but not overlapping.
- Thread the loose end through the loop you created in step 2.
- Hold onto both ends of the line and pull them tightly to secure the knot close to the bobber.
Remember, a secure bobber stopper knot is vital as it will prevent the bobber from sliding up and down the line while you’re casting or reeling in your catch.
Attaching A Swivel
An additional step to consider when preparing your fishing line is attaching a swivel. A swivel helps prevent line twisting and allows for easier lure or bait changes. Here’s how you can attach a swivel:
- Take the end of your fishing line and thread it through the eye of the swivel.
- Carefully thread the same end back through the swivel’s other eye, creating a loop around the swivel.
- Hold onto both ends of the line and pull them tightly to secure the swivel in place.
Attaching a swivel will give you the flexibility to quickly switch baits or lures without having to re-tie your entire line. It’s a small but efficient addition to your fishing gear.
By following these simple steps, you’ll have your fishing line prepared and ready to go with a bobber and swivel. Now, you can head out confidently, knowing that your line is secure and your chances of a successful fishing experience are greatly improved.
Attaching The Bobber
Attaching the bobber to your fishing line is a simple process. Slide the bobber onto the line, above your desired fishing depth, and secure it with a knot or stopper. The bobber will help you detect fish bites and improve your fishing experience.
Once you have chosen the right bobber for your fishing needs, it is important to know how to properly attach it to your fishing line. Attaching the bobber correctly will help improve your fishing experience and increase your chances of a successful catch. In this section, we will guide you through the process of attaching the bobber to your fishing line, so you can begin your angling adventure with confidence.
Sliding The Bobber Onto The Line
Before you attach the bobber, make sure you have your fishing line ready. Thread the end of your fishing line through the top of the bobber, also known as the bobber’s hollow tube. Slowly slide the bobber down the line, making sure it is positioned at the desired depth for your fishing location. For beginners, it is recommended to start with the bobber placed around 1 to 2 feet above your bait. This will allow you to easily detect bites and adjust the depth if needed.
Securing The Bobber
Once you have slid the bobber onto the fishing line, it is essential to secure it in place to prevent it from moving during your fishing expedition. There are a few methods you can use to ensure your bobber stays in position:
- Bobber Stopper: This small rubber or plastic piece is designed specifically for securing bobbers. Place the bobber stopper on the line below the bobber, and then slide it up towards the bobber until it rests against it. This will keep the bobber securely in place.
- Split Shot: Another method is to use a split shot sinker. Simply pinch the sinker onto the fishing line just above the bobber. The weight of the split shot will hold the bobber in position.
- Slip Knot: For advanced anglers, a slip knot can be used to secure the bobber. Tie a slip knot above and below the bobber, ensuring it is tight enough to hold the bobber in place but still allowing it to move freely along the line.
Whichever method you choose, make sure it is secure enough to withstand a good tug or nibble from a fish. A loose bobber could easily slide up and down the line, making it difficult to detect bites in a timely manner.
By following these simple steps, you can properly attach your bobber to your fishing line, giving you the confidence to cast your line and enjoy a fruitful fishing trip. Remember to consider the type of fishing you will be doing and adjust the depth of your bobber accordingly. Now, it’s time to get out there and catch some fish!
Using The Bobber
When it comes to improving your fishing success, using a bobber can be a game-changer. Not only does it help to suspend your bait at a desired depth, but it also serves as a visual indicator when a fish bites. However, knowing how to properly put a bobber on your fishing line is crucial for optimal performance. In this section, we will explore the steps of casting and retrieving with a bobber and how to effectively detect fish bites.
Casting And Retrieving
- To begin, attach your bobber to your fishing line. Slide the bobber stop onto the line, followed by the bobber itself. The bobber stop should be placed a few inches above the desired fishing depth.
- Once the bobber is attached, cast your line into the water. Make sure to aim for areas where fish are likely to be, such as near underwater structures or in areas with vegetation.
- After casting, let the bobber settle on the water’s surface. This allows the bait to sink to the desired fishing depth. Watch the bobber closely for any sudden movements or dips.
- Retrieve your line by reeling it in slowly and steadily. Keep an eye on the bobber as you reel, as any changes in its position or behavior could indicate a fish bite.
Detecting Fish Bites
- Pay close attention to the bobber’s movement. If it suddenly disappears under the water or moves in an erratic manner, it could be a sign that a fish has taken the bait.
- When you detect a fish bite, resist the urge to immediately set the hook. Instead, wait for the bobber to fully submerge or dip completely before setting the hook with a quick and firm upward motion.
- It’s important to stay patient while waiting for fish bites. Some bites may be subtle and require a keen eye to notice. Take your time and remain focused on the bobber, ensuring you don’t miss any potential opportunities.
In conclusion, mastering the art of using a bobber on your fishing line can significantly enhance your fishing experience. By following these steps for casting, retrieving, and detecting fish bites, you’ll increase your chances of success on your next fishing adventure.
Frequently Asked Questions For How To Put Bobber On Fishing Line
What Is The Purpose Of A Bobber In Fishing?
A bobber is used in fishing to indicate when a fish has taken the bait. It floats on the water’s surface and is attached to the fishing line. When a fish bites, the bobber will sink or move, alerting the angler to a potential catch.
Can You Fish Without A Bobber?
Yes, you can fish without a bobber. Many anglers prefer to fish without a bobber, instead opting for other techniques such as bottom fishing or using bait that sinks naturally. However, using a bobber can be helpful, especially when fishing for certain species or in specific conditions.
It’s a matter of personal preference.
Last Word
In this blog post, we have explored the step-by-step process of putting a bobber on a fishing line. By following these simple instructions, you can easily enhance your fishing experience and improve your chances of catching more fish. Remember, choosing the right bobber size and positioning it correctly on your line is crucial for success.
So go ahead and give it a try, and may your fishing adventures be filled with exciting catches! Happy fishing!